VMware Aria Automation Cloud Consumption Interface (CCI) – Part 1
Setting Up Single Sign-On for CCI – Part 2
Configuring the CCI Infrastructure – Part 3
Now that we’ve covered off the basics of what the Cloud Consumption Interface is and gone through the process to setup Single Sign-On inside of vCenter. In this post we will cover configuring CCI infrastructure inside of Aria Automation. This process is going to get quite in-depth with submitting YAML spec files, as such I’ve uploaded all below examples to my GitHub repo for reference.
Authenticating to CCI
As of Aria Automation 8.17, not everything required to configure the CCI infrastructure can be achieved in the GUI, as such we need to download the CCI kubectl plug-in so we can perform configuration via the CLI. As you might suspect, you will also need kubectl to use the plug-in as we need to connect to Kubernetes running on Aria Automation. The easiest way to get this, is to download the Tanzu version of kubectl which also comes with the vSphere plugin and follow those instructions from within vCenter.
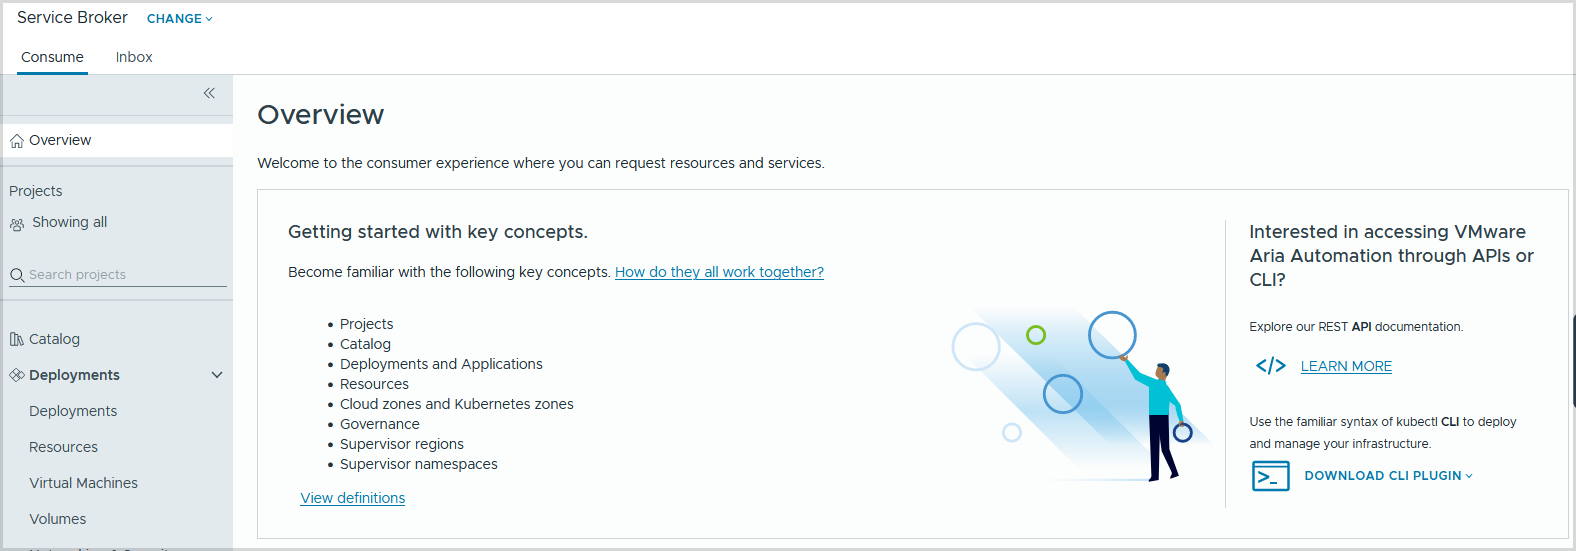
There’s a number of different ways to download the CCI kubectl plug-in. Most of which is all done through the Service Broker of Aria Automation. If CCI hasn’t been setup before you should have an Overview page where you can download the CLI plugin.
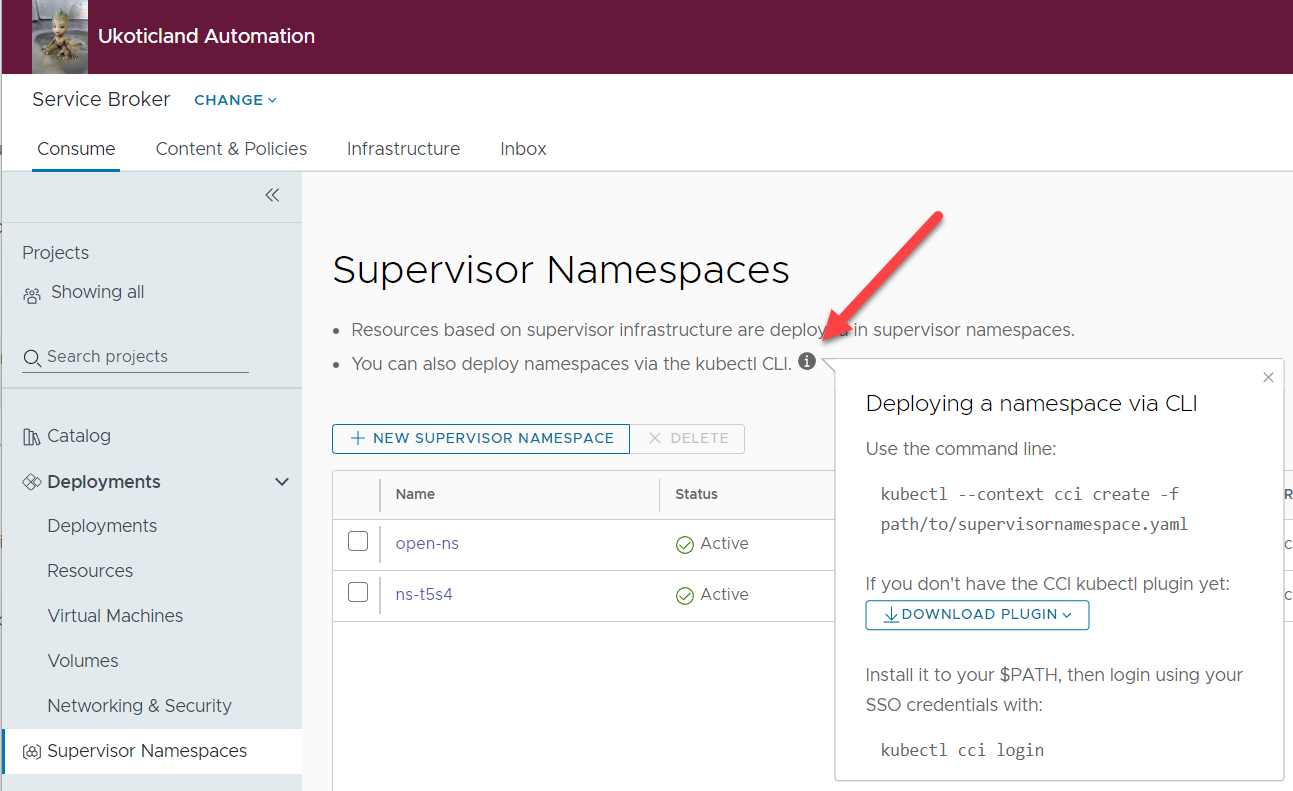
Another method is clicking on Supervisor Namespaces and clicking the little information icon. This method is really only if you have previously setup CCI.
The last method is downloading directly from VMware by Broadcom’s Artifactory repository. This may be beneficial to you as you may want a different version of the plugin to the one provided inside of your Aria Automation version.
https://packages.broadcom.com/artifactory/cci
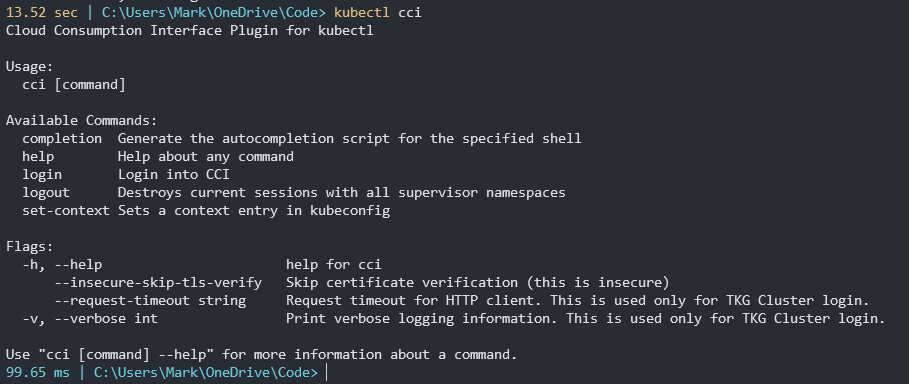
My my case I downloaded the Windows CCI plug-in version. I renamed the file to have a .EXE extension at the end and I placed the file in the same folder location of my kubectl and vSphere kubectl plug-in. Try typing kubectl cci to see if you have all your paths set correct.
Next we need to login to CCI. Depending on the version of the CCI plugin you have you may need to login via different methods. The version provided in AA 8.16.2 allows you to login with a username or token. The version provided in AA 8.17 only allows logging in with a token. I’ll do my best to show both methods here.
Username login is by far the easiest and can be done in one step. You appliance is your Aria Automation box.
kubectl cci login -u <your_username> --server appliance.domain.com --insecure-skip-tls-verify
If you’re using AA 8.17 and cannot login with the -u parameter, you will need to login using a token using the -t parameter, and to do that you’ll need to obtain a token first. I used a Windows box for this process, but whether you’re using Windows or Linux the process is basically the same using the curl command.
If using the system domain for authentication, format a curl command as below.
curl --insecure --request POST https://aria_automation_server/csp/gateway/am/api/login?access_token --header ‘Content-Type: application/json’ --data-raw ‘{“username”: “configadmin”,”password”: “password”}’
If using a domain account for authentication, format the the curl command with domain in the body.
curl --insecure --request POST https://aria_automation_server/csp/gateway/am/api/login?access_token --header ‘Content-Type: application/json’ --data-raw ‘{“username”: “[email protected]”,”password”: “password”, “domain”: “mydomain.com”}’
If successful this should provide a refresh token similar to below.

Copy that refresh token and login similar to how we would using a username.
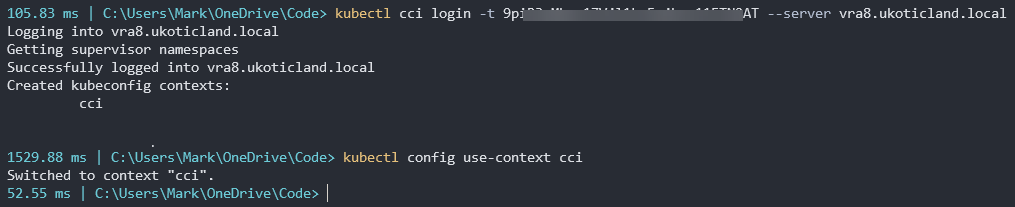
kubectl cci login -t <YOUR_API_TOKEN> --server appliance.domain.com --insecure-skip-tls-verify
Just like Kubernetes, we need to change to the correct context for cci.
kubectl config use-context cci
Configuring the Infrastructure
If that all worked and you are able to login successfully, now begins the real fun in setting up the CCI infrastructure by submitting a number of YAML config files. You could, if comfortable, submit these all in one command. But I suggest you submit each one at a time to confirm that it was successful before moving on to the next step. I’ve tried to use all real life examples below and comment the important lines. All examples below are up on my CCI GitHub repo for reference.
Step 1. Create a project and project role binding
Here we create an AA project specific for CCI.
kubectl create -f cci-project.yaml
apiVersion: project.cci.vmware.com/v1alpha1
kind: Project
metadata:
  name: cci  # your cci project name here
spec:
  description: cci project
  sharedResources: true
Next we create a project role binding. This basically assigns users or groups to the AA project.
kubectl create -f cci-projectrolebinding-user.yaml
apiVersion: authorization.cci.vmware.com/v1alpha1
kind: ProjectRoleBinding
metadata:
  # name must match the subject kind and name
  name: cci:user:yourdomain.com:jsmith
  namespace: cci
subjects:
  - kind: User  # User / Group
    name: "[email protected]"  # UPN your name here
roleRef:
  apiGroup: authorization.cci.vmware.com
  kind: ProjectRole
  name: admin # admin / edit / view
Pay close attention to the format of the name. The metadata name needs to be in a very specific format. This is very import if you’re to submit successfully.
Step 2. Create a region
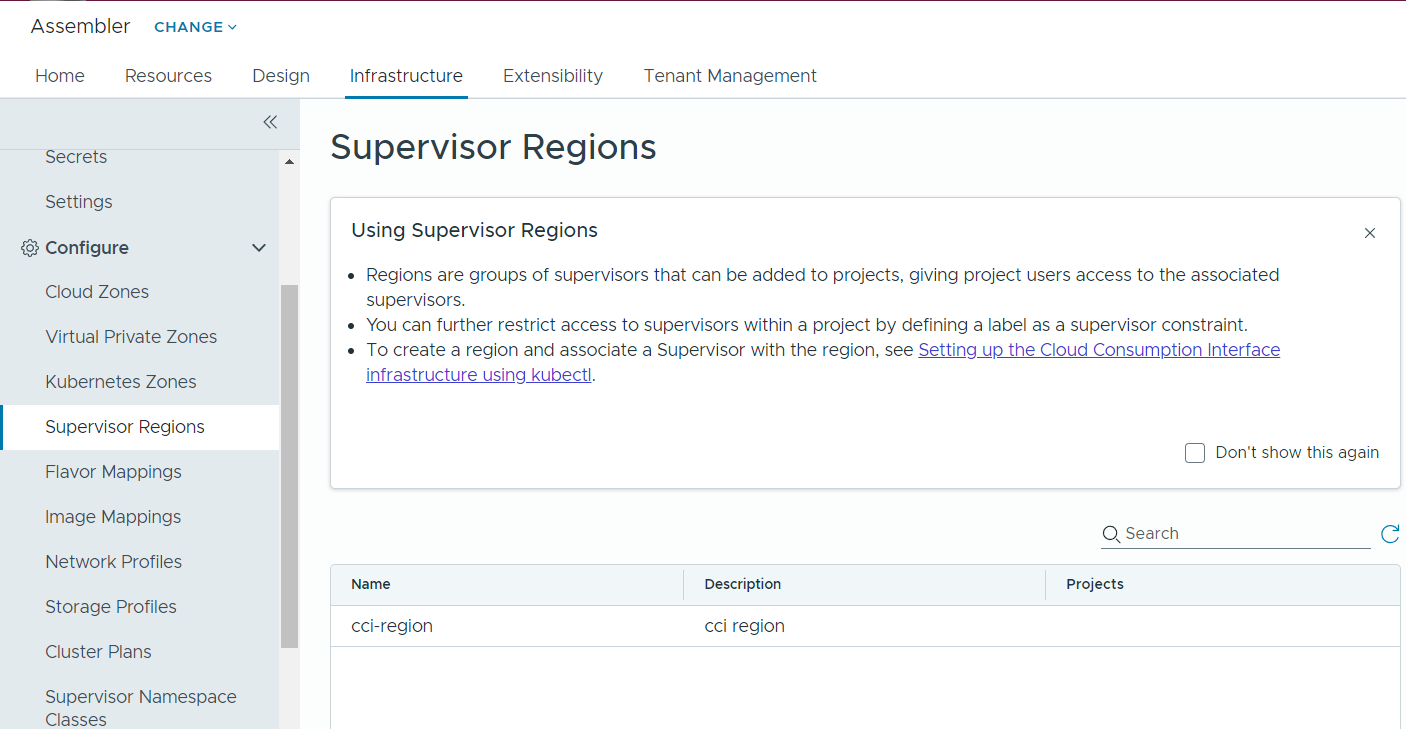
Here we create a region for CCI. Regions are very important to CCI as it’s how we group our supervisor clusters.
kubectl create -f cci-region.yaml
apiVersion: topology.cci.vmware.com/v1alpha1
kind: Region
metadata:
  name: cci-region  # you region name here
spec:
  description: cci region
Once added, you should see this region under Supervisor Regions in Assembler. Notice no projects associated to the region yet.
Step 3. Associate a Supervisor with a region
For this step there is no YAML file to submit. Rather we need to edit our supervisor. First we need to figure out the full name of our supervisor.
kubectl -n cci-config get supervisors
This should return the full name of our supervisor.
Once we have the name we can edit it.
kubectl -n cci-config edit supervisor vc01.ukoticland.local:domain-c8
# Please edit the object below. Lines beginning with a '#' will be ignored,
# and an empty file will abort the edit. If an error occurs while saving this file will be
# reopened with the relevant failures.
#
apiVersion: infrastructure.cci.vmware.com/v1alpha1
kind: Supervisor
metadata:
  annotations:
    infrastructure.cci.vmware.com/cloud-account-id: 4e3cd55c-d8dc-4dca-bbf5-644ce3d7ded2
  creationTimestamp: "2021-04-17T11:57:40Z"
  labels:
    environment: development  # place a label / tag here
  name: vc01.ukoticland.local:domain-c8
  namespace: cci-config
  uid: e1739075a1d6a717053d37930698a025fc726289
spec:
  cloudAccountName: vc01.ukoticland.local
  displayName: Cluster
  externalId: domain-c8
  regionNames:
  - cci-region  # add your region here
status:
  powerState: "On"
Two values need to be added here. A label, which is in essence a tag to AA. You can use any value here, just remember it for later. And a region. Use the region name you created above.
Step 4. Create a region binding and region binding config
Now we have to create a region binding. This is basically adding our region to our project that we first created.
kubectl create -f cci-regionbinding.yaml
apiVersion: topology.cci.vmware.com/v1alpha1
kind: RegionBinding
metadata:
  name: cci-region  # your region name here
  namespace: cci   # your cci project name here
Next we need to create some region binding config. This is adding a label / tag for this region binding. Make sure this label / tag matches the one you created above when editing the supervisor.
kubectl create -f cci-regionbindingconfig.yaml
apiVersion: topology.cci.vmware.com/v1alpha1
kind: RegionBindingConfig
metadata:
  name: cci-region   # your region name here
  namespace: cci   # your cci project name here
spec:
  supervisorSelector:
    matchExpressions:
      - key: environment
        operator: In
        values:
          - development   # your tag value here
You should now see a project associated with the CCI region under Supervisor Regions in Assembler.

Step 5. Create a Supervisor namespace class and config
Ok we’re almost there 🙂 . Just a few more YAML files to submit.
Here we have to create a Supervisor namespace class. This gets references a few times with CCI, so use a name you are comfortable with. The namespace class defines pod count limits. I just went with the defaults here.
kubectl create -f cci-supervisor-ns-class.yaml
apiVersion: infrastructure.cci.vmware.com/v1alpha1
kind: SupervisorNamespaceClass
metadata:
  name: default-ns-class  # your class name here
spec:
  description: supervisor namespace class
  parameters:
    - name: podCountLimit
      type: Integer
      minimum: 100
      maximum: 1000
      default: 500
Then, similar to the region binding config, we need to create some supervisor namespace class config.
kubectl create -f supervisor-ns-class-config.yaml
apiVersion: infrastructure.cci.vmware.com/v1alpha1
kind: SupervisorNamespaceClassConfig
metadata:
  name: default-ns-class   # your class name here
spec:
  storageClasses:
    - name: tanzu-storage-policy  # your storage class name that maps to your vCenter policy here
  vmClasses:
    - name: best-effort-tiny
    - name: best-effort-small
    - name: best-effort-medium
  contentSources:
    - name: "vm-librararry"  # this is your VM content source.  Not your TKR content source
      type: ContentLibrary
  # Below limits are an EXAMPLE! Setting them may cause unexpected behavior in your namespace
  # Either set reasonable limits, or remove the below section to get unlimited resources
  limits:
    - name: pod_count
      limit: "((parameters.podCountLimit))"
  supervisorSelector:
    matchExpressions:
      - key: environment
        operator: In
        values:
          - development   # your tag name here
There are a number of values that need to be modified here. For the contentSources, use a library where you store / or will store VM images that you want to use for Windows, Linux, etc. This is not the content store where Tanzu Kubernetes images live. This gets automatically added so you don’t have to worry about that. You also need to reference that same label / tag value again.
Step 6. Associate namespace class with a project
Home stretch… We finally associate our namespace class with our project we created right at the top.
kubectl create -f cci-supervisor-ns-class-binding.yaml
apiVersion: infrastructure.cci.vmware.com/v1alpha1
kind: SupervisorNamespaceClassBinding
metadata:
  name: default-ns-class   # your class name here
  namespace: cci   # your cci project name here
spec:
  overrideParameters:
    - name: podCountLimit
      type: Integer
      const: 1000
The override parameters are optionally here. I just went with the example config and left it in.
WooHoo, you made it again! That’s it for configuration. If you submitted all your YAML files successfully, you are now ready to start consuming CCI from Aria Automation. I’m not going to lie. Setting up v1 of CCI is quite an in-depth process. Expect future versions of AA to be a much simpler process which can hopefully all be done from the AA GUI. But never the less, now that you have completed the configuration, you can now start consuming CCI capabilities.
In the next post in this series I will get into how to consume CCI from the GUI as a user / developer and start deploying Kubernetes services..
References
Preparing to use the Command Line Interface to perform CCI tasks
Setting up the Cloud Consumption Interface infrastructure using kubectl
GitHub CCI example repo
The kubectl-cci plugin command-line does not allow logging in with the username switch