I thought I would created a short blog series on a very underrated collection of PowerShell modules from Cisco called the Cisco UCS PowerTool Suite. The UCS PowerTool Suite was released back in early 2013 and has been steadily growing and maturing since. The current release of the PowerTool Suite, as of this blog post, is 2.2.1 which contains 5 modules and over 4500 Cmdlets! Yes that’s right, over 4500 Cmdlets, crazy huh.
PowerTool brings PowerShell and all its goodness to Cisco UCS and allows you to script and automated your UCS management is a very powerful way. PowerTool can connect to Cisco UCS Manager, UCS Central and UCS IMC (namely C-Series and E-Series). PowerTool isn’t doing anything special behind the scenes. It connects via the standard XML APIs that the Java GUI uses to connect to things like UCS Manager, as well as respecting and working with the Management Information Tree (MIT) that UCS is built on.
In Part 1 of this series I run through the basics of installing UCS PowerTool and connecting to your first UCS Manager.
Before you install the UCS PowerTool Suite you need to meet a few requirements. PowerTool is not currently compatible with PowerShell Core so at present you will need a Windows box running the following.
- Windows PowerShell 3.0 or higher
- .NET Framework Version 4.5 or higher
- PowerShell 4.0 and higher for the DSC module resources
Once you met these requirements you can download the latest version of UCS PowerTool from Cisco. Then proceed to install from the MSI file. The installation wizard is straight forward and will copy the modules to your C:\Program Files (x86)\WindowsPowerShell\Modules folder along with three shortcuts to your desktop. Each shortcut, Cisco IMC PowerTool, Cisco UCS Central PowerTool, and Cisco UCS Manager PowerTool, runs a small startup script that basically loads their respective module.
We don’t need to actually use these shortcuts if we choose not to. We can just run PowerShell as we normally would and import the modules as needed. If we’re running Windows Server, though, these module will actually auto load for us.
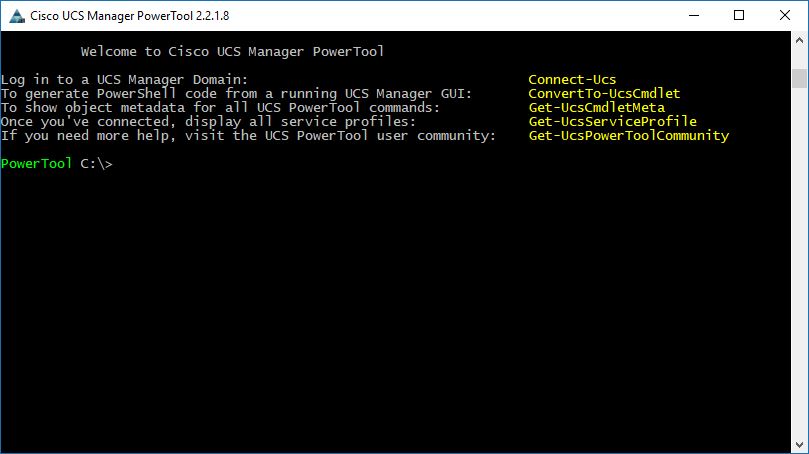
Below is what we see when we use the shortcut, Cisco UCS Manager PowerTool.
Below we will delve into connecting to our first UCS Manager, but first let’s run through a few of the basics. First we run Get-Module -ListAvailable. This will show us all the modules available on our system. Below we can see the five Cisco modules we just installed.
PowerTool C:\> Get-Module -ListAvailable

    Directory: C:\Program Files (x86)\WindowsPowerShell\Modules


ModuleType Version    Name                                ExportedCommands
---------- -------    ----                                ----------------
Binary     2.2.1.8    Cisco.IMC                           {FnResetImcPowerProfile, FnTestImcLd...
Binary     2.2.1.8    Cisco.UCS.Core                      {Add-UcsHardwareProfile, Get-UcsPowe...
Manifest   2.2.1.8    Cisco.UCS.DesiredStateConfiguration {Get-UcsConnection, Get-ImcConnection}
Binary     2.2.1.8    Cisco.UCSCentral                    {Connect-UcsCentral, Disconnect-UcsC...
Binary     2.2.1.8    Cisco.UCSManager                    {Connect-Ucs, Disconnect-Ucs, Start-...
Script     1.0.1      Microsoft.PowerShell.Operation.V... {Get-OperationValidation, Invoke-Ope...
Binary     1.0.0.1    PackageManagement                   {Find-Package, Get-Package, Get-Pack...
Binary     1.0.0.0    PackageManagement                   {Find-Package, Get-Package, Get-Pack...
Script     3.4.0      Pester                              {Describe, Context, It, Should...}
Script     1.0.0.1    PowerShellGet                       {Install-Module, Find-Module, Save-M...


PowerTool C:\>
Next we run Get-Command -Module Cisco.UcsManager. This displays all the Cmdlets inside this module, all 4500+ of them! Once you’ve memorised them all we can move on… just kidding 🙂
PowerTool C:\> Get-Command -Module Cisco.UcsManager
...
Cmdlet          Set-UcsWwnInitiator                                2.2.1.8    Cisco.UCSManager
Cmdlet          Set-UcsWwnPool                                     2.2.1.8    Cisco.UCSManager
Cmdlet          Start-UcsGuiSession                                2.2.1.8    Cisco.UCSManager
Cmdlet          Start-UcsKvmSession                                2.2.1.8    Cisco.UCSManager
Cmdlet          Start-UcsServer                                    2.2.1.8    Cisco.UCSManager
Cmdlet          Start-UcsTransaction                               2.2.1.8    Cisco.UCSManager
Cmdlet          Stop-UcsServer                                     2.2.1.8    Cisco.UCSManager
Cmdlet          Sync-UcsManagedObject                              2.2.1.8    Cisco.UCSManager
Cmdlet          Undo-UcsTransaction                                2.2.1.8    Cisco.UCSManager
Cmdlet          Update-UcsCatalogue                                2.2.1.8    Cisco.UCSManager
Cmdlet          Update-UcsFirmware                                 2.2.1.8    Cisco.UCSManager
Cmdlet          Watch-Ucs                                          2.2.1.8    Cisco.UCSManager

PowerTool C:\>
To connect to our UCSM we use the Cmdlet Connect-Ucs. To find out how to do this we can use Get-Help to find example syntax.
PowerTool C:\> get-help connect-ucs

NAME
    Connect-Ucs

SYNOPSIS
    Connects to a UCS


SYNTAX
    Connect-Ucs [-Name] <string[]> [-Credential] <PSCredential> [-Port <ushort>] [-NoSsl]
    [-NotDefault] [-Proxy <WebProxy>] [<CommonParameters>]

    Connect-Ucs -LiteralPath <string> -Key <SecureString> [-NotDefault] [-Proxy <WebProxy>]
    [<CommonParameters>]

    Connect-Ucs -Path <string> -Key <SecureString> [-NotDefault] [-Proxy <WebProxy>]
    [<CommonParameters>]


DESCRIPTION
    Connects to a UCS. The cmdlet starts a new session using the specified parameters. One can
    have more than one connections to a server. PowerTool Supports working with multiple default
    servers. This can be enabled by setting SupportMultipleDefaultUcs using
    Set-UcsPowerToolConfiguration.
We’re now ready to make our first connection. In the below example we connect using the Cmdlet Connect-Ucs and save the connection to the variable $handle1. This gives us the flexibility to connect to multiple UCSM devices at the same time and run commands against them. Something which I’ll cover more on in a future post.
PowerTool C:\> $handle1 = Connect-Ucs -Name 10.1.1.1
Running the command gives a credential request dialog box. Enter in the same credentials you normally would when connecting to your UCSM.

If we run Get-UcsPSSession we can display our current session details. Here you can see that we’re connected to UCS UCSPE-10-1-1-11
PowerTool C:\> Get-UcsPSSession

NumPendingConfigs : 0
Ucs : UCSPE-10-1-1-11
Cookie : 1494751391/e26549b0-557a-4ba7-83a8-c1ae36468ebb
Domains : org-root
LastUpdateTime : 14-May-17 6:43:14 PM
Name : 10.0.30.77
NoSsl : False
NumWatchers : 0
Port : 443
Priv : {aaa, admin, ext-lan-config, ext-lan-policy...}
PromptOnCompleteTransaction : False
Proxy :
RefreshPeriod : 600
SessionId :
TransactionInProgress : False
Uri : https://10.1.1.11
UserName : ucspe
Version : 3.1(2b)
VirtualIpv4Address : 10.1.1.11
WatchThreadStatus : None
Here’s where things get a little interesting. We can export this session to an XML file, using Export-UcsPSSession, and with a secure key we can connect to our UCS in the future without providing credential details.
In the below example we export our current session to an XML file called ucspe.xml and type in a secure key. Next using ConvertTo-SecureString we can export the key we used to a file called ucspe.key which we can use to decrypt our password in the XML file.
PowerTool C:\> Export-UcsPSSession -LiteralPath C:\cisco\ucspe.xml
cmdlet Export-UcsPSSession at command pipeline position 1
Supply values for the following parameters:
Key: ********

PowerTool C:\> ConvertTo-SecureString -String "Password" -AsPlainText -Force | ConvertFrom-SecureString | Out-File ucspe2.key
Now we can use our key file and our XML file to connect to our UCSM without being prompted for credentials.
PowerTool C:\> $key = ConvertTo-SecureString (Get-Content C:\cisco\ucspe.key)

PowerTool C:\> $handle1 = connect-ucs -Key $key -LiteralPath C:\cisco\ucspe.xml
The key file should, of course, be treated as highly sensitive. Steps should be taken to protect unauthorized people accessing and reading this file. I find a good way to protect it is by locking down permissions on the file and folder where the XML and key file are stored. In my case only myself and the Scheduled Task account that requires it can access the file.
Last we should know how to cleanly disconnect from our UCSM session. This simply requires the use of Disconnect-Ucs. In the below example we also reference our session in the variable $handle1 which is good practice if we are connecting to multiple UCSM devices.
PowerTool C:\> Disconnect-Ucs -Ucs $handle1
In Part 1 of this series I cover the minimum requirements you need on your system before install PowerTool. I then go through the fundamental basics of making your first connection to a UCS Manager. Then taking it one step further and showing how we can future connect without providing credentials. Finally I show how to disconnect from the UCSM. In Part 2 of this series I will run through the basics of querying information from UCSM via some of the 4500+ Cmdlets.
Cisco UCS PowerTool Suite – Part 1
Cisco UCS PowerTool Suite – Part 2
Cisco UCS PowerTool Suite – Part 3
References
Cisco UCS PowerTool Suite
Cisco UCS PowerTool Suite Communities Page
2 thoughts on “Cisco UCS PowerTool Suite – Part 1”