It’s been a week now since I’ve been playing with Onyx. I stand by my initial impressions that it’s a great little app. If you’re into automation, and lets face it, who isn’t these days. You should really give Onyx a looking into. Now it’s not going to write any scripts for you. But what it’s going to do is give you the core code of your actions in the vSphere Client.
I’ve had Onyx running in the background behind my vSphere Client for the past week. What I found interesting, or depressing, was looking at the same code pop up in the background as I did the same repetitious tasks in the vSphere Client. A lot of my repetitious actions could be condensed into a handful of lines of PowerCLI code. All that was stopping me was a copy and paste from Onyx into a PowerCLI script.
As I start focusing more on PowerCLI I can myself referring to Onyx to help cut some of the guess work out of what commands I need to be running to achieve my objectives. As i said, it’s not going to write a script for you, but it’s going to give you a good head start.
Below are the steps to get started with Onyx.
Once you download the ZIP file uncompress it to a folder. Locate Onyx.exe in the root of that folder and execute it. No installation is required.
A small window will open. You can click on the blue cog and change the default settings (which are fine to initially start with) and then click on the orange asterisk in the top left corner.

This will open a connection window. Type in the vCenter URL. You can leave off the HTTPS if you wish and Onyx will insert it for you.
To simplify the process of connecting to the Onyx proxy with the vSphere Client click the checkbox to ‘Launch a client after connected‘.
Select VMware VI Client from the dropdown menu. Then enter in your standard login credentials to vCenter and click Start.

The vSphere Client will start up and make a connection to the Onyx Service on your PC using the credentials you entered on the previous screen. A warning will pop up stating that your connection is not encrypted and if you want to proceed. Click Yes to continue.
It’s worth noting that the connection between Onyx and vCenter is still encrypted. What’s not encrypted is your local proxied connection from the Sphere Client to Onyx. For Onyx to see you actions from the vSphere Client it needs an unencrypted session.

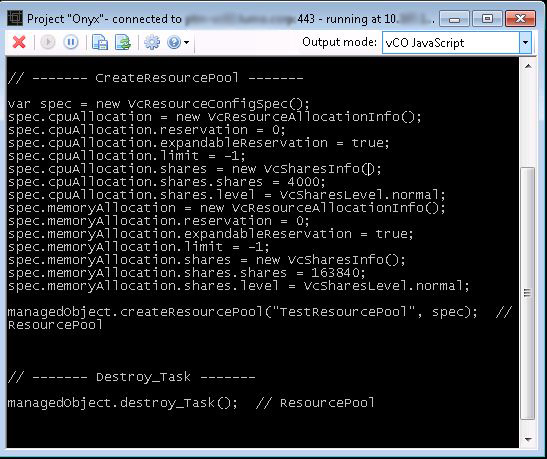
If all successful up to this point your vSphere Client will connect to vCenter. You’ll also see that the Onyx window will show a black screen and will say it’s connect to your vCenter on port 443 and running at your PC.

Now all we have to do is select our Output Mode, in this case, PowerCLI. Then click the green play button on the top left.
As we perform actions in the vSphere Client they will be translated to code. Below is the PowerCLI output from creating a new Resource Pool.

Below is the equivalent code but for VMware Orchestrator in JavaScript.
And that’s it. You can copy and past code out by right click on the code. You can also use the save button to save all the output to a file.
Reference Links