As of vRealize Automation 8.1, Ansible Tower is supported as an Integration in Cloud Assembly, specifically Tower versions 3.5, 3.6 and now 3.7 (in vRA 8.2). Tower integration is treated as a first class citizen in vRA. Allowing you to consume Ansible resources directly on the design canvas of a cloud template. It is worth noting, though, that it’s also possible to integrate AWX into vRA as well. AWX being the upstream project of Ansible Tower. Now this wouldn’t be a supported scenario, either from VMware supporting AWX integration or just simply AWX being a supported product from RedHat. But from a testing and development stand point, it’s an easy way to mimic Ansible Tower Integration into vRealize Automation 8.
The actual integration into vRA is a straight forward one. Though there are a few little gotchas in getting it to work and integrate correctly. Below I run through the steps I used in standing up an AWX environment from scratch and Integrating it into vRA 8.2. This is far from a production ready solution, so at your own peril.
If you’ve got a Linux box with Docker and AWX pre-configured you can skip the next few steps and jump straight to the vRA Integration steps. If not, I try and do my best to explain the process I took configuring my CentOS box to run AWX.
To begin with I’m using CentOS 7. Now every distro seems to have a slightly different way of doing things but the key take-away will ultimately be the same. We install Docker and Ansible, We deploy AWX using Docker Compose. We deploy and configure Nginx to proxy requests over TLS (this is required for integration). And finally we integrate AWX into vRA. There’s a lot of steps to work through, so let’s get into it.
Installing Dependencies
This first part is easy. We just sort out a few dependencies before we start installing our products.
yum remove python-docker-py
yum install -y epel-release
yum install -y yum-utils device-mapper-persistent-data lvm2 ansible git python-devel python-pip python-docker-py vim-enhanced python3 python36-docker
pip install cryptography
pip install jsonschema
pip install docker-compose
pip install docker –upgrade
Installing Docker
Next we add our Docker repo into CentOS, install, and start.
yum-config-manager --add-repo https://download.docker.com/linux/centos/docker-ce.rep
yum install docker-ce -y
systemctl start docker
systemctl enable docker
Deploying AWX
To install AWX we clone the Git repo to a location on our box.
git clone https://github.com/ansible/awx.git
cd awx/
git clone https://github.com/ansible/awx-logos.git
cd installer/
Use VIM to edit the inventory file.vim inventory
Add the following line to the file.
awx_official=true
Optionally, you can also search for and change the default username and password, which is admin / password, in this file.
:wq! to save the file. Then run the installation playbook.
ansible-playbook -i inventory install.yml -vv
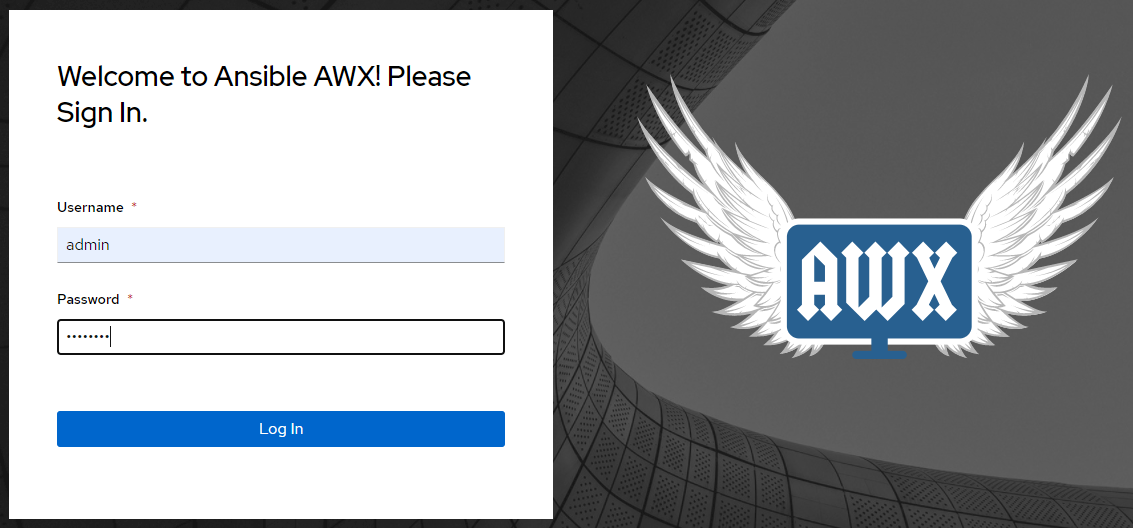
If successful, you can access the AWX UI over port 80 at http://{server_name}:80. The default credentials will be admin / password unless you changed them in the inventory file.
On my first attempt at installing AWX I ran into a few issues with the firewall and Python version. So it’s worth checking if the firewall is restricting anything and your python dependencies are all sorted out.
Installing Nginx
We now need to install Nginx to proxy requests over TLS port 443. This is important because vRA has a hard integration endpoint to this port. You’re unable to use HTTP (Default for an AWX install) or a different TLS port number with vRA (as of 8.2).
yum install nginx -y
Next we generate a quick and dirty self-signed certificate to use.
openssl req -x509 -nodes -days 365 -newkey rsa:2048 -keyout /etc/nginx/ssl/nginx-selfsigned.key -out /etc/nginx/ssl/nginx-selfsigned.crtopenssl dhparam -out /etc/nginx/ssl/dhparam.pem 2048
Edit the nginx.conf file.
vim /etc/nginx/nginx.conf
Replace the server section in the file with below, replacing server_name with your server FQDN. Carefully validate your changes here as a typo is easy to do.
server {
  listen 443 ssl http2;
  server_name awx.ukoticland.local;

  access_log /var/log/nginx/awx.access.log;
  error_log /var/log/nginx/awx.error.log;

  ssl on;
  ssl_certificate /etc/nginx/ssl/nginx-selfsigned.crt;
  ssl_certificate_key /etc/nginx/ssl/nginx-selfsigned.key;
  ssl_session_timeout 5m;
  ssl_ciphers EECDH+CHACHA20:EECDH+AES128:RSA+AES128:EECDH+AES256:RSA+AES256:EECDH+3DES:RSA+3DES:!MD5;
  ssl_protocols TLSv1.2;
  ssl_prefer_server_ciphers on;

location / {
  proxy_http_version 1.1;
  proxy_set_header Host $host;
  proxy_set_header X-Real-IP $remote_addr;
  proxy_set_header X-Forwarded-For $proxy_add_x_forwarded_for;
  proxy_set_header X-Forwarded-Proto $scheme;
  proxy_set_header Upgrade $http_upgrade;
  proxy_set_header Connection "upgrade";
  proxy_pass http://localhost:80/;
  }
}
:wq! to save the file.
This next line helps with HTTP 503 proxy errors when using SE Linux.
setsebool -P httpd_can_network_connect true
Now start Nginx.
systemctl start nginx
systemctl enable nginx
At this point you can try and access AWX over port 443 using https://{server_name}:443.
As before, unless you changed the username and password in the steps above, the default credentials are admin / password.
vRA Integration
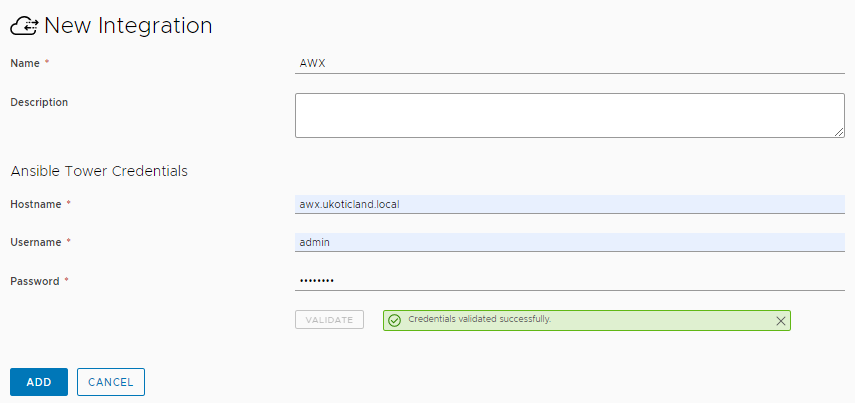
Finally now we come to the point that we can actually create the vRA integration with AWX. Go to Infrastructure > Connections > Integrations and click New Integration. We give a name for the Integration, this will be used as the account in our cloud templates. We type in our hostname. Do not include https or a port here. It’s not required and you will receive an error if you attempt to do so. Lastly, our username and password. For simplicity I’m using the default AWX creds when deployed. Hit Validate and if successful click Save.
Great, we’re now in a position where we can create a playbook, or more accurately a job template in AWX. Followed by a cloud template in vRA that will use the AWX template. I’m going to try and not go into too much crazy detail here. Rather I’ll just call out the notable sections.
Head back over to the AWX UI and login.
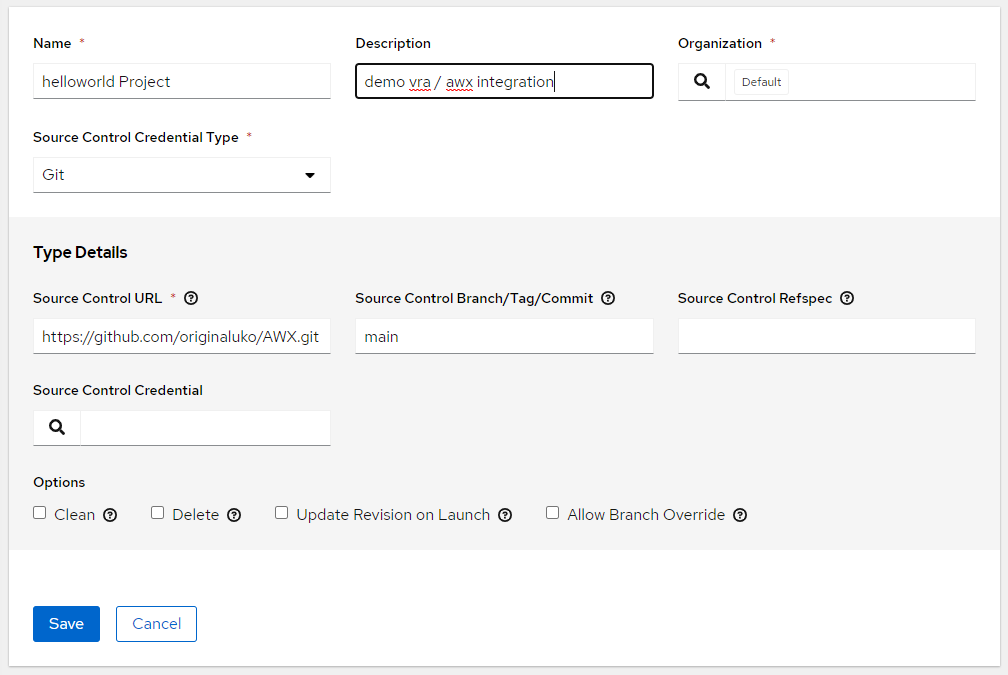
Go to Resources / Projects and click Add project. Give it a Name, Description and Org (Default is fine here). Select Source Control Type. I’m using Git and pulling my Ansible code from GitHub (example helloworld playbook here). If you require credentials you can enter them in. Once done click Save.
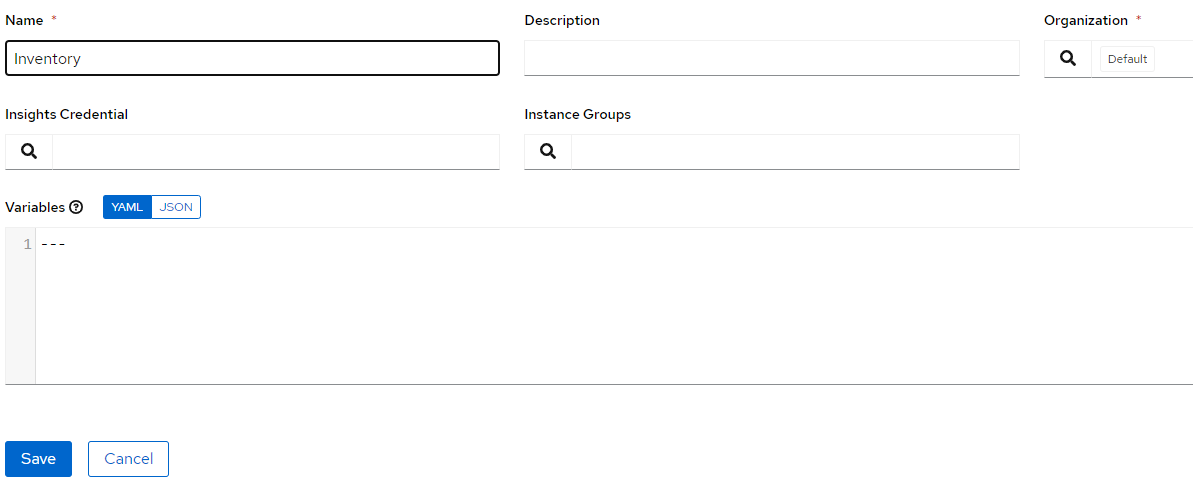
Now go to Resources / Inventory and click Add Inventory. We don’t need anything special here for now. Just a name, in my case Inventory.
Lastly, we bring it all together in the AWX UI, go to Resources / Templates and click Add job template.

Give the template a name, Helloworld in my example. For Inventory select the Inventory we just created. In Project select the project we create above. For Playbook you can select the yaml file that’s in your source control linked to the project. Select the Credentials that AWX will attempt to connect with to the deployed machine. Lastly, locate Limit and check the box Prompt on launch. vRA uses the Limit filter to allow AWX to only target the machine being deployed in the vRA cloud template.
Are we there yet…
I promise, this is the final part of the puzzle. We can now create a vRA Cloud Template that will leverage the Ansible AWX integration and run our Helloworld job template we created.
Go ahead and created a new Cloud Template in vRA as you normally would. Scroll down on the left Resources and locate Configuration Management. Drag Ansible Tower onto the canvas.
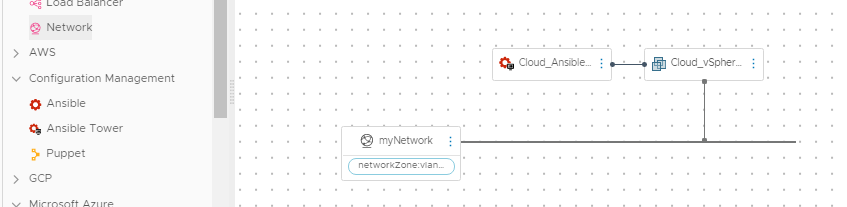
We need a few pieces of information here for the Cloud.Ansible.Tower resource type. First is the account name. This is the Ansible Tower (AWX) Integration name we gave when we created the integration. We need the Job Template name that we created in AWX that we want to run (This is case sensitive). Finally we need to reference the machine we are going to get AWX to manage during deployment. How simple is that?!?!
resources:
  Cloud_Ansible_Tower_1:
    type: Cloud.Ansible.Tower
    properties:
      account: AWX
      jobTemplates:
        provision:
          - Helloworld
      host: '${resource.Cloud_vSphere_Machine_1.*}'
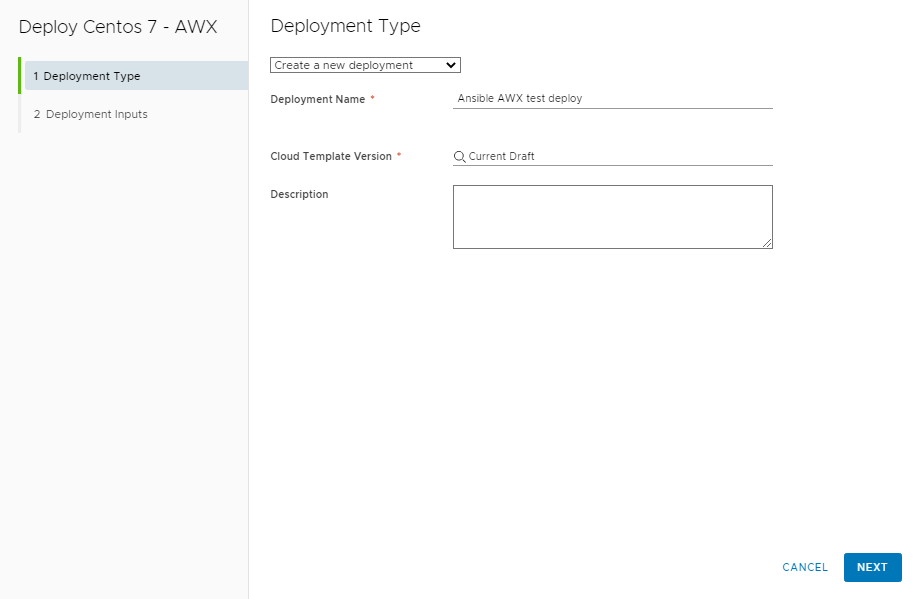
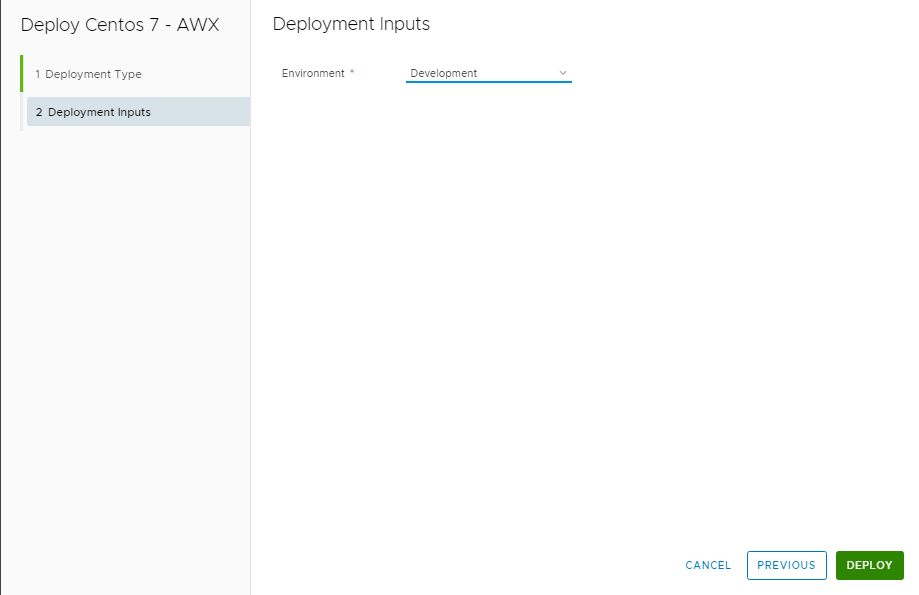
We can go ahead and now attempt a deploy of the cloud template we just created.
Once the deployment completes you should see a few status messages for the Cloud.Ansible.Tower resource type.
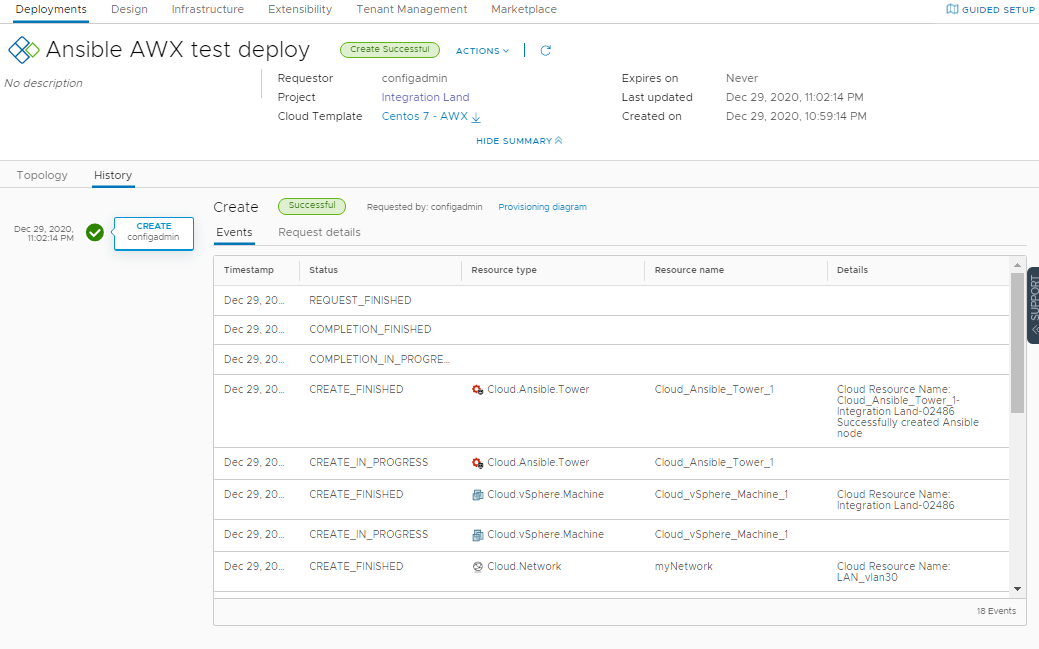
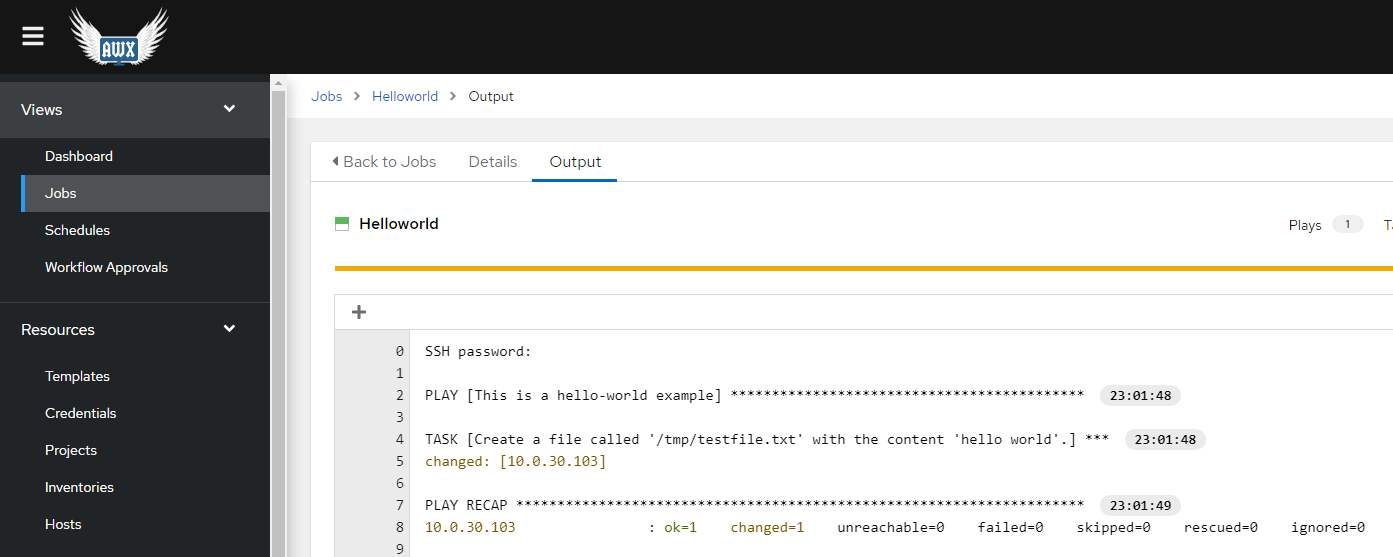
Over in AWX you should be able to inspect the job that was run.
Conclusion
So this post turned out to be much much longer than I expected. If you are reading this, well done, and thanks for pushing through to the end. Despite the post being so long, the bulk of the work is really just setting up a fresh AWX server. If you already have an AWX environment up and running. Skip those steps and it’s relatively easy and straight forward to integrated AWX into vRA 8.
Now are you game enough to use this outside of a lab environment?