I’m currently working on a Packer build process for a customer using ESXi. The last time I had worked on Packer was over a year ago and I quickly realised how fast I forgot many things for a successful build. It’s also been interesting to experience new bugs and nuances using new versions of products. So I thought I might document some of my experiences to get to a successful build. I think this will easily turn into a multi-part post so I will attempt to document my process as much in order as possible.
A quick recap to Packer if you’re new to it all. Packer is brought to you by the good folks that brought you Terraform and Vagrant --HashiCorp. It’s a relatively small single file executable that you can use to programmatically build images through scripts. You can then take those images and upload them to AWS, Azure, or in my case, VMware ESXi.
While Packer works great with tools like Vagrant and VirtualBox. As a VMware Consultant I want to leverage ESXi for the build process. But before we can start with a Packer build we need to set up a few prerequisites on ESXi.
The first thing we need to do is designate an ESXi host for our builds. The reason we need a host and not a vCenter is that Packer will connect to the host via SSH and use various vim-cmd commands to do it’s work. Once we have a host there are three steps to complete, listed below.
Enable SSH
First we need to enable SSH on our host. There’s a number of different ways to do this. The two easiest ways are via the ESXi host Web Client or if managed by vCenter inside that.
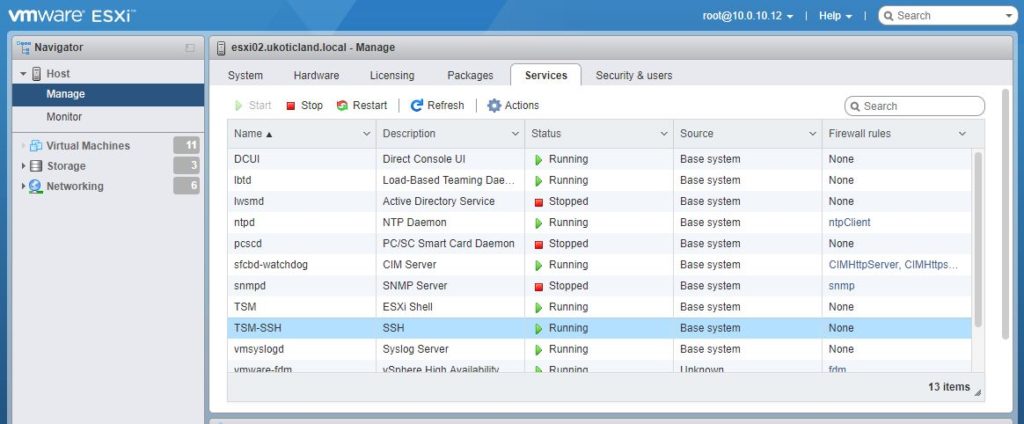
For the host web client, navigate in a browser to https://esxi_host/ui and login with the root account. Navigate to the Manage pane and select the Services tab. Scroll down to TSM-SSH and click Start. Under Actions you may also want to change the policy to Start and Stop with Host.
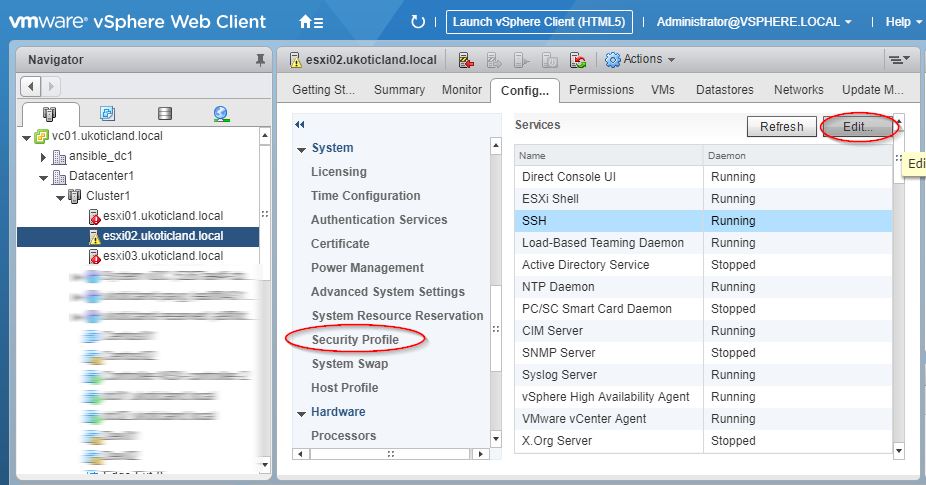
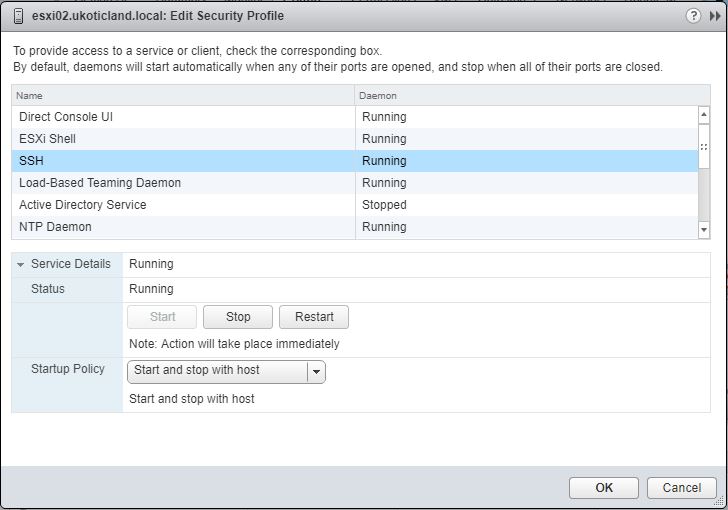
In vCenter it’s a little different. Locate the host you have designated. Select the Configuration Tab. Scroll down to Security Profile and Click Edit. A new window will appear. Scroll and locate SSH, select start and change the Startup Policy to Start and stop with host.
Enable GuestIPHack
Next we need to run a command on the ESXi host. What this command does is allow Packer to infer the IP address of the Guest VM via ARP Packet Inspection.
SSH onto the ESXi host (e.g. using putty) and run the below command.
esxcli system settings advanced set -o /Net/GuestIPHack -i 1
Open VNC firewall ports on ESXi
Lastly, Packer uses VNC to issue boot commands to the Guest VM. I believe the default range is 5900 -- 6000. 5900 being the default for VNC but if you’re performing multiple builds or the port is in use Packer will cycle through the range until it finds an available one.
Run the following commands on the host to allow us to modify and save the firewall service.xml file.
chmod 644 /etc/vmware/firewall/service.xml
chmod +t /etc/vmware/firewall/service.xml
vi /etc/vmware/firewall/service.xml
Scroll to the very end of the file and just above the last line /ConfigRoot press i (to insert) and add the below in.
<service id="1000">
  <id>packer-vnc-custom</id>
  <rule id="0000">
    <direction>inbound</direction>
    <protocol>tcp</protocol>
    <porttype>dst</porttype>
    <port>
      <begin>5900</begin>
      <end>6000</end>
    </port>
  </rule>
  <enabled>true</enabled>
  <required>true</required>
</service>
press ESC and type in :wq! to save and quit out of the file.
Restore the permissions of the service.xml file and restart the firewall.
chmod 444 /etc/vmware/firewall/service.xml
esxcli network firewall refresh
You can check if you successfully made the change by heading back over to the host in the web client and checking the Security Profile section. Only the first port will be shown and not the range. You can also use the below commands on the host to confirm and see the entire range of ports set.
esxcli network firewall ruleset list
esxcli network firewall ruleset rule list
These are the only three changes you really need to make to an ESXi host for a Packer build to work successfully. I’ve tried to go into a little detail of each step to provide an explanation of what each change is doing. In reality it should only take a few minutes to implement.
In some secure environments I’ve seen SSH set with a timeout. If you notice SSH disable after you’ve enabled it. You’ll need to remove the timeout as SSH needs to stay enabled. You’ll also want to confirm that no external firewalls are blocking access to the VNC port range from Packer.
In future posts I’ll go into detail around the prerequisites in configuring a Windows Server to run Packer and importing / exporting OVF images.
Why ESXi vs Workstation or Virtualbox?
Not a right/wrong conversation but having a similar debate and just curious.
Hi Bob. Yeah good question. While Workstation and VirtualBox are good tools and work well for individual developers using Packer. I don’t feel they are suited for an enterprise solution. Particularly in a situation where you have multiple builds of images taking place and scheduled to run weekly (if not daily). Then having those images uploaded to a catalog to be consumed by all.
Hi Mark,
Thank you for sharing the document, it’s quite useful
No more working on ESXi 7.0